Overview:
In order not to waste time on installation in the workshop, it is better to get all the installations done beforehand. It’s not a lot, I estimate that all installations will take you less than an hour.
This will include:
Overview:
In order not to waste time on installation in the workshop, it is better to get all the installations done beforehand. It’s not a lot, I estimate that all installations will take you less than an hour.
This will include:
Making Music!
Overview:
Now that we have two LEDs that can blink, we are ready to add the buzzer!
We will play the Star Wars Imperial March! But we will do it with Arduino (your code notes are taken from this link. Note that it’s in Spanish).
Task Goal:
To play a song with the buzzer, and for every time a note is played, a led will blink.
Electronics:
For this task, in addition to the board and the electronic components we used before (LEDs, resistors, breadboard) we will use a buzzer. In addition, depending on the type of the buzzer, we may need two jumper wires.

Source Code:
Folder name: part_4_music
Instructions:
This part assumes that you have 3 leds connected to GPIOs 11, 12, 13 (see part 3).
-
It is helpful to have the Bluefruit-LE pinout open while you work.
-
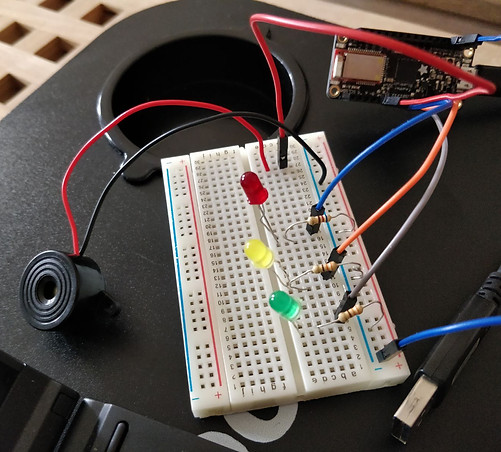
The Buzzer has two wires that you will need to connect:
-
The black wire of the buzzer (or the short let) shall be connected to the breadboard ground line (GND). This can be done directly or indirectly, where the leg is connected to the breadboard and a jumper wire is connecting it’s line to the GND line.
-
The red wire (or the long leg) shall be connected to GPIO 9. This can be done directly or indirectly, where the leg is connected to the breadboard and a jumper wire is connecting it’s line to the GPIO.
-
Compile and upload our example. The buzzer shall play the song and two out of the three LEDs shall blink!
-
Modify the code so all three LEDs will blink with the song.
-
There are many ways you can extend this exercise:
-
Look at the next section, I found some great songs that you can play.
-
Pick a song of your own, find the notes online and integrate them into your code.
-
BONUS: Currently, when a song is playing, the entire system waits for it to end. Can you change the function so it will allow the main loop() to be responsive once every X milliseconds? (hint: a change in the API is needed). Read more about the concept of a coroutine.
-
-
Your setup shall look like this:


All Videos
Here is some more fun for you:
I found a few links for you if you want notes for other songs, or just want to get inspired by other Arduino Projects out there:
-
Super Mario Theme (note that this code is more generic and better written than most of the Arduino sketches you can find online).
-
Game of Thrones Theme with Arduino (I found the notes here).
-
DESPACITO notes can be found here (in Spanish!) note that you have fewer leds than in the example.
-
More of Star Wars (note that in this project they did not tweak the duration properly so it sounds artificial and can be improved).
-
My favorite project is this 3-Buzzers-Birthday - it is too advance for our workshop - but here is the code for it.
-
If you want to get expert in making sounds with Arduino here is a great link.

