Overview:
In order not to waste time on installation in the workshop, it is better to get all the installations done beforehand. It’s not a lot, I estimate that all installations will take you less than an hour.
This will include:
Overview:
In order not to waste time on installation in the workshop, it is better to get all the installations done beforehand. It’s not a lot, I estimate that all installations will take you less than an hour.
This will include:
Introduction to ARDUINO
for the Embedded Systems Workshop
Arduino - The Basics
-
An Arduino program is usually called “a sketch”, and its file extension is *.ino (the Arduino/Genuino file extension).
-
The *.ino is just like a cpp file, but must implement the loop() and the setup() functions. We will be talking about it more in the workshop.
-
When you will save an Arduino file with the name “my_file_name”, the IDE will create for you a folder named “my_file_name” and inside a file named “my_file_name.ino”. Other files in the folder can be of type c / cpp / h (but shall not contain the loop() and setup() functions).
-
void setup() - This is initialization procedure. This function will be called once, at the beginning of the program.
-
void loop() - This is the MCU main loop. REMEMBER! - Arduino runs without an operating system, so this loop is everything! It will run on and on as long the device has battery / power source :)
Arduino - Syntax and Functions
-
How do we code for arduino? Coding for Arduino is basically C/C++ syntax with some additional saved words that Arduino uses link “byte” (uint8_t) or defines (HIGH / LOW - that represent 0x1 / 0x0).
-
Besides the code that we write, and that c library provides us, we can also use some standard Arduino functions. The API and documentations are on the Arduino website. We may use some of these functions in the workshop. Unfortunately we will not have time to go over them deeply, so I recommend you reading about some of them: digitalWrite(), pinMode(), analogRead(), noTone(), tone(), delay(), delayMicroseconds(), micros(), millis(). Some of them are just as trivial as their name.
Arduino - Libraries
From Arduino Website: “The Arduino environment can be extended through the use of libraries, just like most programming platforms. Libraries provide extra functionality for use in sketches, e.g. working with hardware or manipulating data”.
-
Please take a look at the variety of libraries that are available when programming for Arduino (No need to go deep, just to understand what types of libraries there are).
-
An important library to know is the “Serial” library. Please take a look at it’s API. This library enable us to print information to the Serial Monitor, as part of the program or for debug process.
How do I add a library?
Well, you can read this great tutorial by Arduino (at the end of the tutorial there is a zip file that you can download with the example library). But I don’t feel that it is necessary to read all the tutorial. Here is a TL;DR + pictures below:
-
Writing an Arduino library is very much like writing a C++ class, where it’s public functions are the library’s API.
-
This class shall be located inside a folder with the same name.
-
“Installing a library” is basically locating it inside the Arduino library folder. For Windows or MacOS is shall be under “Arduino/libraries”, and for Linux it shall be under: “arduinosketchfolder/libraries/”.
-
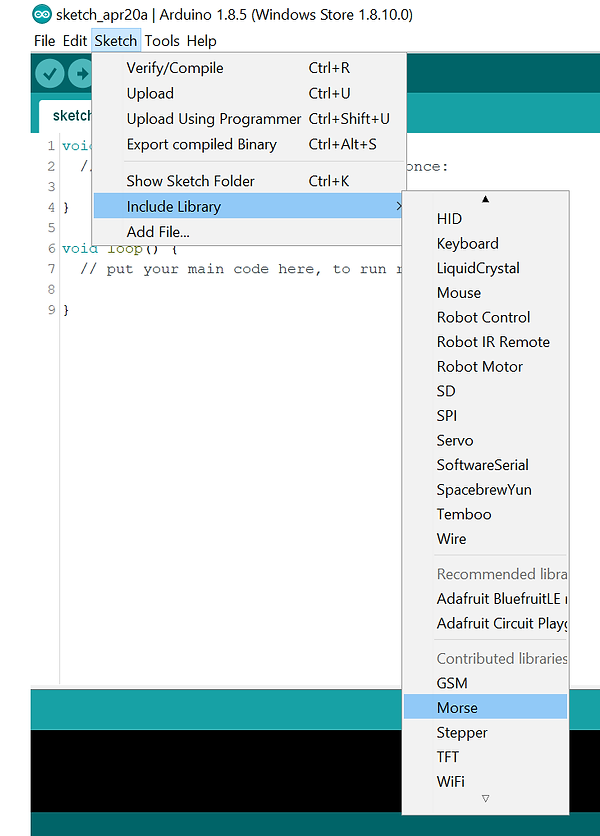
When adding a library, the IDE will recognize it (if you restart the IDE), and will enable you to “#include” the library using GUI. All these GUI-clicks just so a single line will be added to our program: #include <my_lib_name.h>
-
It will be nice of you to add to your library an “examples” folder, with *.ino examples (located inside a folder with the same name).
-
The Arduino IDE does not know how to recognize functions and class names automatically, therefore it uses a “keyword.txt” file that is also located inside the library folder. The file defines “saved words” and can color them in orange (KEYWORD1, for class names, i.e. constructors) or in brown (KEYWORD2 for functions).

Arduino “Morse” library example on Windows

Arduino "Morse" Library keywords.txt content

Adding an Installed Library to Arduino