Overview:
In order not to waste time on installation in the workshop, it is better to get all the installations done beforehand. It’s not a lot, I estimate that all installations will take you less than an hour.
This will include:
Overview:
In order not to waste time on installation in the workshop, it is better to get all the installations done beforehand. It’s not a lot, I estimate that all installations will take you less than an hour.
This will include:
BLE Warm-Up #1
UART over BLE
Overview:
We are already familiar with UART, and use it all the time when we print via the Arduino “Serial” library. In this part of the workshop, we will see how UART is implemented over the BLE-link.
Well, it's obliviously cannot be literally implemented over BLE, since it's wireless :) but logically it is. It is a UART (Serial Port) emulation over BLE, using a proprietary BLE service, the Nordic UART Service (for more details about NUS see this link).
Data will flow from our mobile phone to nRF51822 (based on ARM® Cortex™ M0), continue to the Arduino-micro-compatible part of the feather-LE board, (that is based on ATmega32u4) via SPI, and eventually to our PC, using USB.

Task Goal:
To transfer strings back and forth between the BLE app on our mobile and our Laptop, through the Feather Bluefruit-LE board.
Source Code:
In this part, we will use the Adafruit's library and code examples, but since the next part is customized, please use the code in the folder named: part_7_ble
Instructions:
-
Compile the code and upload it to your board. After uploading process is done, open serial Monitor when it is done. (It shall look like picture-1).
-
Make sure your Bluetooth is ON on your mobile phone.
-
Open the Bluefruit-LE app on your mobile, and search for your device. It shall have the name “Adafruit Bluefruit LE” (like all other devices in our workshop). you can identify your device by it’s RSSI. it shall be the strongest, and RSSI shall get stronger when the mobile phone is closer to your device. If you can’t recognize your device, please see the troubleshooting section below (last part of this part).
-
Connect to your device, by pressing the gray “connect” button (see picture-2).
-
A menu with a few options will open, press “UART” (see picture-2). It will take a few seconds to connect, If the connection failed, repeat steps 3-5. When the connection is established, a blue let will light up on the Bluefruit-LE board.
-
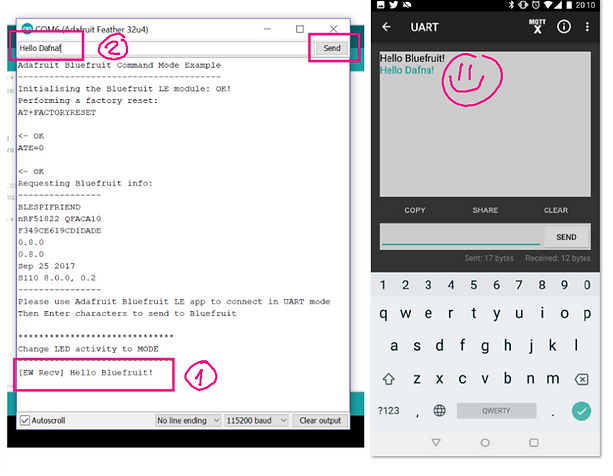
Now you will be able to send text over the BLE-UART, type “Hello Bluefruit!” and press “Send” (see picture-2). The text shall be displayed on the Arduino serial monitor screen (see picture-3).
-
Write “Hello <your name>!” (for example: “Hello Dafna!”) in the Arduino serial monitor and press “Send”. The text shall be displayed on the Bluefruit-LE Mobile Application (see picture-3).
Screenshots of the Process:

Picture-1 : Arduino Serial Monitor on startup.

Picture-2 : UART over BLE process, part 1

Picture-3 : UART over BLE process, part 2